Tuesday, April 30, 2013

Inching Our Way To The Next Grade


The end of the school year is near...*do I hear faint cheers in the background?? =)*! 

I am piggy backing off the same idea I did last year which is a caterpillar theme. The title is "Inching Our Way To The Next Grade!"

I had the kids make their own caterpillars to add to the bulletin board! Here is what I did:

I had 5 circles on a piece of paper for all my students. They each got a handout.


Click below to get your own printout!


I then used dot to dot paint. (I allowed two colors per kid so it didn't turn into brown mush.)


Purple dot to dot paint:


Yellow dot to dot paint:


Cut your circles out:


Put the circles together and add the legs. I used 8 black legs from construction paper with 2 black antennas.


 Add two eyes and a smile and BAM.....Wa-La! How cute right?


I added them to the bulletin board and it truly made the board!!


It is as Simple as 1-2-3!


Monday, April 29, 2013

The Magic Of Vinyl Inside The Classroom!


Items you will need:
-Silhouette Machine
-Vinyl

First make a circle on your silhouette machine. Choose your vinyl and cut away!


I cut out four different circles and placed them on my kidney table in my classroom.!
They stick perfectly to the table and come off smooth if need be. I use them for sorting activities, writing activities and placement spots for students to have their own working mat when working in a mini group!


You can sort anything! Colors, animals, shapes, size of objects, money etc. You don't need to use all four mats at the same time either.   You might only use two mats to sort and thats okay! Differentiate per student on their needs!

Example- sorting four colors:


You can have students write sight words, their name, letters, numbers etc.
Here we are adding using the Touch Point Math Program.

Example- writing number sentences


Use a Mr. Clean Magic Eraser and it comes right off!


 Wa-La!


It is as Simple as 1-2-3!


Wednesday, April 24, 2013

Set of 6 BPA-Free Double-Wall 16-Ounce Capacity Reusable To Go Travel Mugs---GREAT DEAL!

Wow!!!! This is a CRAZY good deal and would make a GREAT gift for someone...GREAT for teacher appreciation week!! :-). This 6-pack comes with the straws & lids too and is marked at 80% off. Plus FREE SHIPPING!!!!

Check it out on amazon!!!!

 It is as Simple as 1-2-3!!

Monday, April 22, 2013

Bowling with Sight Words


So in my classroom I try to be as creative as possible with the learning process! As most of you know I am a teacher in a self contained classroom. Legally I am allowed up to 8 kids in the classroom. This year I only have 6!

One of my students LOVES to bowl! So I found this amazing idea on no other then my fave website.... PINTEREST! 


SOOOO I found this bowling set at the good old dollar store and I had the labeling machine so total cost for this project is... you got it.. $1.00!


Print out 10 sight words that you are currently working on, you can interchange them as you go! I did some new and some old for review! I do this so my students not only have a challenge but also feel successful with learning!


Label the bowling pins and you are good to go!!


When the students are participating in social play this would be a great activity to use!  You are working on social skills (taking turns, verbal cues etc.) as well as ELA goals. When the student bowls whatever pins they knock down they have the read the words out loud to the other students. If they are able to, let them spell the word out loud as well. Take it one step further...have the student use the word in a sentence! I have kids on all different levels so this is a great way to differentiate !


It is as Simple as 1-2-3


PVC Piping to the Rescue!

I can't stand messy draws, cabinets and closets. So when I saw this idea it was right up my ally! I found it on Pinterest--Duh! (Lets Decorate).

So I showed my husband and he got right on to making it for me!! He IS the best!

What you will need:

PVC Piping (big enough to fit your hair dryer or whatever tool you want)
J-B Weld


This is what it looks like:


Choose cabinet door:


Take it off the hinge:


Lay it flat on the ground!
He then cut the PVC piping to size and stuck it on the door with the bonding glue. The glue got a little messy so be careful..VERY hard to remove. 

"Measure twice cut once!"

After two days I was able to use my handy-dandy holders!


He cut grooves in the curling iron holders just in case I wanted to interchange them I would be able to. But me and my OCDness is planning on labeling each pipe so I know what tool goes where =)!


Ta-Da!


He is pretty handy!!


It is as Simple as 1-2-3!


Sunday, April 21, 2013

A Concrete Slab goes from Drab to Fab !

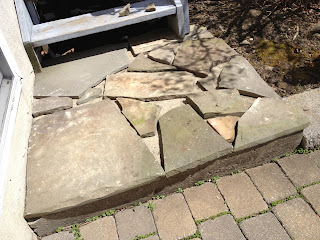
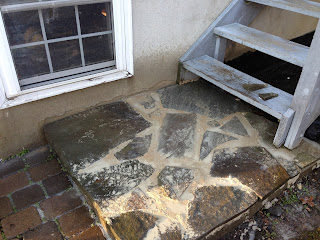
We have this concrete slab at the bottom of our deck stairs! It is pretty boring!! My neighbor came over and gave us a great idea to lay flagstone on the slab! Now flagstone is pretty expansive...but our neighbors are pretty awesome and had left over flagstone from their old patio. This project = $0 cost! They are amazing neighbors and like 2nd parents to us! We are truly blessed and grateful!!

Here is a sneak preview...


So my neighbor let us take what we needed and my husband and I got to work!! He first washed down all the stone!


Then we laid the stone out on the conrete slab to see how we wanted it to look!


 Kevin got all the necessities that he needed at HD so we did have to spend a little money!

#2- bags of mortar mix
#2- bottles of concrete bonding mix
#1- 5 gallon bucket


He mixed it all together and got to work!


It drys pretty quickly (15 minutes) so we had to work quickly!


Once you have all the edges filled in you take a sponge and clean water and clean off the excess mortar on the stones.


Ta-Da! He is pretty amazing right?


I am so impressed with my man! This was his first time ever using mortar or putting down flagstone so I was super pleased and proud of him!!


Here is a sneak preview of what part of our patio is going to look like! We had grass and weeds under our deck and where my garden is! We laid down black liner material and pinned it into the ground. We then are going to lay river rock all underneath= less maintenance and cheaper then laying mulch! Only $27 a yard!  We took a few bigger flagstone pieces from my neighbor and laid stepping stones to my garden! My full "How To" will be coming soon!

Sneak Peek Before:


Sneak Peek After (so far):


Stay tuned for the finished product! I am so excited to see it myself!!


It is as Simple as 1-2-3!