As I sit here on this beautiful sunny day...I am taking in all that I am grateful for. After the recent events in Boston it has made me sit back and reflect all the amazing things I have in my life and I am humbled. I am grateful for my husband and how he provides for me and our home as well as my family, friends and job. I tend to say " I don't have enough time to do this or that.." or "I have too much to do.." or the best excuse " I am tired!" But at the age of 26...I shouldn't be stressed out or saying I don't have enough time or that I am tired. I am learning slowly but surely that I need to embrace everyday as if it was my last and be grateful for all the things God has given me!
That being said...this past weekend my husband was a workin' machine in our yard! I must thank the website Pinterest for inspiring me and helping me get out of the funk of "I don't and I can't". We ended up fixing up our patio with some great new features!! I will be posting them as we finish them! From fire-pits, to our deck we have touched it all!
Here is how we made our new fire-pit:
We had an old stand alone fire-pit for years that was collecting water on our patio. We didn't use it as much because my husband built a bigger camp fire, fire-pit out in our yard! I happen to come across this link on Pinterest and got inspired to redo our old fire-pit so that we would now have two of them! If it has rained the night before or we can't go on the grass for some reason we now can use the fire-pit on our patio instead!
So we went to good old Home Depot and picked out our stone. We ended up buying thirty stones for the price of $1.91 a stone.
When we got home Kevin placed the stones around in a circle. Make sure they are snug as a bug in a rug! You don't want any gaps!
Make three three layers of stone (10 blocks per ring).
Our dog Jack was happy to stand by and watch his dad hard at work!
Almost done!!
We discarded the frame of the fire-pit and just used the bowl and grate.
When you place it on the wall make sure the lip is comfortably placed on the stone so that it won't fall in!
Here are a few view of the finished fire-pit from up above:
Ta-Da! All done!!
Tip: Drill a hole in the bowl of the fire-pit. This will prevent water build up from rain and help with air flow! One hole should do the trick!
From drab to fab!! The blocks match our patio perfectly and we have given our old fire-pit a face lift!
Here are a few other things we did while building the fire-pit:
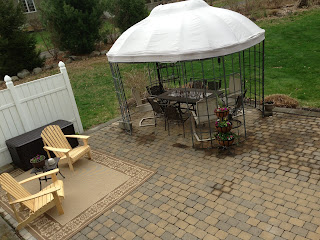
We used to have a hot tub (amazing!) but it broke :o( boo! So we needed to come up with something to do with the empty space we were left with!
A new rug with wooden chairs did the trick! It added more seating for our guests and a nice place for me and Kevin to sit on spring nights! We also got a side table and a cushion container! I have been needing one of these for quite some time now! I don't think carrying our seat cushions from our upstairs down two flights of stairs is the safest idea!!
My dad bought me this awesome flower pot for Christmas! Three layers of flowers! I think my creation came out pretty fabulous! What do you think? Jack seems to like it! =) Bought all plants at HD!
The fire-pit took us about 30 minutes to put together! For a reasonable price I think we did pretty good!!
It is as Simple as 1-2-3!


5 comments:
Such a pretty patio!!
Thank you!!
It’s a good idea that you used bricks with smooth-surfaced top and bottom, but with textured sides. It’s a convenient strategy to achieve neat layering, but still manage to add enough character in it. Plus, stone is probably the safest material to use. Metal can melt and has the tendency to get distorted in the long run.
That is actually something I would like for our patio! And the best part is, you can easily dismantle it or move it to another location if need be. Now I need to look for the right stones, preferably some that matches our patio. Thanks for the post!
Now all you need is a collapsible cover for that area for hotter than hot weather or when nature decides to rain in on your outdoor party. Love the carpet, btw!
I think we still have some pavers from when we built our patio. Gonna look for those and try to make our own fire pit in the backyard. Cheers!
Post a Comment